Note:
I am using my old computer that had crashed 4 years and I refused to pay a fortune to get it fixed. I have been fooling around trying to restore it myself. I think I have it working but all the programs look so ancient. I was able to download about 400 of my latest photos I had on my camera card still. Sooooooooooo, hopefully, I am back blogging while I try to figure a way to get my other computer fixed without bankrupting me.
I took these photos last week in between the two snow days we had. ALL will enlare if you CLICK on them.
At the "entrance" to the peninsula and looking west one has a beautiful view.
Something intrigues me about this tree -- perhaps how the branches go in different directions at certain sections of it.
The blues between the sky and the river help the snow on Mt. Hood to stand out even tho it is just a tiny part of the photo.
Can't leave without a close up of Mt. Hood and the 205 bridge over the Columbia River.
Friday, January 30, 2009
Wednesday, January 28, 2009
A sad note
I can blog by using the commuunity room (in my apt. building) computer BUT I can't upload photos so this may be the end of my blogging days. I don't know. If my computer crashed -- which is a good possibility -- then I have no photos and what is my blog without a photo for the postcards? I don't know what I did wrong on my computer -- maybe uploaded too many photos to iPhoto? (I meant to get them taken off and burned on CDs but didn't get around to it. sigh
I had such a great entry for Bridges Between coming up next Monday. I also had two wonderful days of snow photos I took this week. Maybe I can fix it. Maybe I can fix an older computer. I don't know but a few prayers wouldn't hurt.
I will still come up to the computer room and read blogs until I have found a personal solution. Check back to see if I have found a way to keep blogging. If I never return, thanks for the memories.
If I lost all the photos on my computer, then that means I won't be able to upload the ones I have taken --but not gotten on the blog -- of "Turtle Place" and "Kiggins House" remodel either. That makes me really sad as that was my project next week to catch up.
Monday, January 26, 2009
Odd Shots MONDAY
If you want to join ODD SHOTS, see Katney
I was trying to take a Macro of some tree buds and this is what I ended up with -- looks like an alien flying through the sky! Do you see IT? Look at those big hands. . .
Down by the river at sunset
Saturday, January 24, 2009
Blog your blessings Sunday: "Our" peninsula. . .
If you care to join us acknowledging our blessings go here: Blue Panther
This piece of land juts out into the Columbia River close to Wintler Park. Years ago, when I first moved to Vancouver, it was just a piece of land/dirt and wild berry bushes overgrowth but you could walk a path out onto the peninsula for a bit. I did but when I got part way out, there was a big hole in the middle and you could see the river down there. It scared me and I never walked out there again. That made me sad because the berries sure were good and it had a beautiful view of Mt. Hood.
Well, now it is great -- has paved paths and greenery (no more berries), no more deep hole and lots of benches and this compass star pavement at the end. To get there, you walk on the paved path along the Columbia either from Wintler Park in the east near the 205 bridge or from Marine Park at the western end.
I showed some of the benches in previous posts when talking about Mt. Hood or featuring the bench itself. It's a beautiful walkway now, thanks to someone who made it a memorial and fixed it up to walk along there or sit for a spell and watch Mt. Hood or action on the Columbia River. My blessing is that we have people who care enough about our river and the walking paths alongside it that they build such beautiful memorial spots for all to enjoy God's gift of nature around us on the Columbia River.
Friday, January 23, 2009
Turtle Blur?
I was practicing using the macro mode on my camera with this seed pod. It looks like a little turtle to me. How about you? It is a little blurry. I have got to figure a way to hold the slim camera when taking photos. I don't have a tripod and I am used to a bigger camera. Thus, I don't realize I am shaking and make a blur. I should remember to "go back" and look at the photo I just took. I do know how to do that. Ü
Thursday, January 22, 2009
Twinkle Plant
I have no idea what kind of plant this is. It attracted my attention because the light leaves looked like twinkling stars. Maybe that is natural or maybe it is changing because of winter. I have no idea and can't find out later BECAUSE I can't rememeber where I shot it. It isn't even a great photo -- I JUST LIKE IT . . .
Tutorial 2 for internet friend
Making a Valentine's Day card. . .
For this you will need a number of things but can vary it according to what supplies you have on hand.
This is what I used:
paper cutter
red, white and black card stock pieces (red is the folded card that is half a piece of card stock)
glue stick -- I use photo safe glue sticks
pop it adhesive foam -- I cut one square in half to be economical
2 rubber stamps -- one a picture and one words
opaque white glitter from Stampin Stuff
heat gun
tiny heart corner edger and red paper scraps--sometimes you can get heart paper punches to do this also
Directions
First I chose the paper card stock colors. Since I was going to make a Valentine's Day card, I chose red.
I cut a sheet of card stock in half and then folded one side of it in half again to form the basic card.
Then I cut a single sheet of white to fit the front of card, leaving a little border of red around the white front.
I like black card stock with red so I decided to "stamp" my teapot set on black. I trim two edges (one of each size) of the black to fit on top of the red background with a red border still available.
Using a clear stamp pad and then pouring Detail White stampin' powder over it and shaking the excess off onto another paper to return to jar later. (I had tried it with Kaleidoscope powder which looks like a rainbow but it didn't show up enough on the black paper so used the Detail White.) Everything I do is an experiment! Ü
This is what it looked like after I shook the remaining loose powder off the paper. Be sure to blow it off and be careful to not touch it. You can use a small paint brush for this if you have one. If you do accidently touch it and spot it. you can add more powder and shake off again more carefully.
I have a embossing heat tool to do the job. Never try a hair dryer on it because the heat is not hot enough. If you get a heat embosser, get it on sale or with a coupon because they are kinda spendy.
I was intending to just frame the black rectangular background of the teapot on the red
but I changed my mind when I goofed-- yes, I do that now and again -- and printed with the stamp pad, a LINE that should not have been there by the spout. (That happens if you arent' careful and "rock" the stamp instead of just pressing down on it hard.) Thus, I decided to trim around the tea pot a little and use it like a cutout on the white background instead. I never waste anything! Ü
Next, I needed to stamp the greeting and did it on red, with a black border of card stock behind it. I used a black Stazon ink pad for that. That is a permanent ink pad but you can use any regular ink pad instead.
I used photo glue to attach it to a border of black.
I used pop dots to elevate it on the card.
I kept looking at it and something didn't seem right. I needed to "pull it all together. So, I put a black rectangle behind the front white card stock and that did the trick! Everything seemed tied together.
THEN, I NOTICED that I had accidently touched the glitter before I had heated it with the heat gun on the edge of the sugar bowl which meant that part would not come out right so I decided to cover up my mistake with a tiny heart for which I had a cutout "corner" press. (The little rectangle I used to cut out the hearts for this, I can use for another card or the inside of this one or . . . Ü)
Finally, I used three strips of double sided tape on the back of the white rectangle to "glue it" to the background.
Inside, I will write in black pen on the red back of the inside card: "Have a cup of tea and think of me, friend!" On top of that I will place a piece of pink vellum with two glue dots at the top and then cover that with a strip of red paper to give it a finished look. I will sign my name at the bottom on the vellum. (I could have also typed those words but my printer is out of ink presently.) I will enclose a special tea bag and it is ready to mail.
Alternate way to make this card if you don't have a heat gun for embossing:
Use a light colored stamp pad for the tea pot on the black OR stamp directly on the white sheet in any color you choose for the tea pot.
OR
Follow directions for red, black and white backgrounds and stamp on white card directly with black both tea setting and words.
For this you will need a number of things but can vary it according to what supplies you have on hand.
This is what I used:
paper cutter
red, white and black card stock pieces (red is the folded card that is half a piece of card stock)
glue stick -- I use photo safe glue sticks
pop it adhesive foam -- I cut one square in half to be economical
2 rubber stamps -- one a picture and one words
opaque white glitter from Stampin Stuff
heat gun
tiny heart corner edger and red paper scraps--sometimes you can get heart paper punches to do this also
First I chose the paper card stock colors. Since I was going to make a Valentine's Day card, I chose red.
I cut a sheet of card stock in half and then folded one side of it in half again to form the basic card.
Then I cut a single sheet of white to fit the front of card, leaving a little border of red around the white front.
I like black card stock with red so I decided to "stamp" my teapot set on black. I trim two edges (one of each size) of the black to fit on top of the red background with a red border still available.
Using a clear stamp pad and then pouring Detail White stampin' powder over it and shaking the excess off onto another paper to return to jar later. (I had tried it with Kaleidoscope powder which looks like a rainbow but it didn't show up enough on the black paper so used the Detail White.) Everything I do is an experiment! Ü
This is what it looked like after I shook the remaining loose powder off the paper. Be sure to blow it off and be careful to not touch it. You can use a small paint brush for this if you have one. If you do accidently touch it and spot it. you can add more powder and shake off again more carefully.
I have a embossing heat tool to do the job. Never try a hair dryer on it because the heat is not hot enough. If you get a heat embosser, get it on sale or with a coupon because they are kinda spendy.
I was intending to just frame the black rectangular background of the teapot on the red
but I changed my mind when I goofed-- yes, I do that now and again -- and printed with the stamp pad, a LINE that should not have been there by the spout. (That happens if you arent' careful and "rock" the stamp instead of just pressing down on it hard.) Thus, I decided to trim around the tea pot a little and use it like a cutout on the white background instead. I never waste anything! Ü
Next, I needed to stamp the greeting and did it on red, with a black border of card stock behind it. I used a black Stazon ink pad for that. That is a permanent ink pad but you can use any regular ink pad instead.
I used photo glue to attach it to a border of black.
I used pop dots to elevate it on the card.
I kept looking at it and something didn't seem right. I needed to "pull it all together. So, I put a black rectangle behind the front white card stock and that did the trick! Everything seemed tied together.
THEN, I NOTICED that I had accidently touched the glitter before I had heated it with the heat gun on the edge of the sugar bowl which meant that part would not come out right so I decided to cover up my mistake with a tiny heart for which I had a cutout "corner" press. (The little rectangle I used to cut out the hearts for this, I can use for another card or the inside of this one or . . . Ü)
Finally, I used three strips of double sided tape on the back of the white rectangle to "glue it" to the background.
Inside, I will write in black pen on the red back of the inside card: "Have a cup of tea and think of me, friend!" On top of that I will place a piece of pink vellum with two glue dots at the top and then cover that with a strip of red paper to give it a finished look. I will sign my name at the bottom on the vellum. (I could have also typed those words but my printer is out of ink presently.) I will enclose a special tea bag and it is ready to mail.
Alternate way to make this card if you don't have a heat gun for embossing:
Use a light colored stamp pad for the tea pot on the black OR stamp directly on the white sheet in any color you choose for the tea pot.
OR
Follow directions for red, black and white backgrounds and stamp on white card directly with black both tea setting and words.
memo to card friend
Blogger isn't let me upload today. I see they are having another outage at 4:00 -- HOPEFULLY, that will fix the problem. I will get the tutorial up asap. I am going to try another post and see it that photo can upload.
Wednesday, January 21, 2009
Tutorial 1 for internet friend. . .
CLICK TO ENLARGE.
You can make a variety of cards with only one stamp. Well, maybe two. . . but you could have typed the thank you words also and used it like as if it were stamped on paper. You just have to think creatively. Recently I made these ten cards, each a little different. I used one main stamp -- the smiley face carrot nose snowman features and the thank you one, some just parts of it.
I usually stamp on a separate piece of white card stock and then trim to fit what I am doing. Exceptions are made, of course, as you can see from the two in the end of first and second rows where I stamped directly on the folded card stock. I did them catywampus so it wouldn't matter if they weren't lined up perfectly.
For the majority of them, I used a medium blue background. I used thin strips of black paper or ribbons to fill in space, make bows etc. Buttons can be used in different places also.
On the first ones in rows one and two, I stamped a strip of white card stock and used a glue stick to attach it to the blue card stock. I stamped the two faces near the top and bottom edges first and then fit the third one in the middle of them.
The triple thank you stamp was used in a variety of ways, depending on what else I had on the card already but it was always added last. When I used the whole thank you stamp, I bordered it with black card stock and then white card stock and raised it with a sticky foam square. These foam squares are expensive so I cut them in half and at times I use the surrounding scraps too! Ü
The one big snowman, I used a ribbon I have in my stash and a little cotton ball for its hat. As in several others, I cut only part of the stamped Thank You and used that on the ribbon, above it or on a narrow strip of card stock that looked like ribbon.
Speaking of ribbon, to hide the frayed edges, I glued the ribbon to the card stock piece that would go on top of the actual card. Then if a bow was to be used, I tied that separately and used a couple little glue dots or one big one to attach it to the ribbon already on the card.
The carrot noses were colored with an orange pencil but could have been colored with a marking pen as well.
This one I made for my friend, Myrl, who is now in a convalescent home. It is yet another card made with the same stamp but just a little different things used to spruce it up.
Just a memory now. . .
Three weeks can make a big difference. Our snow is all gone now but the news said there's a possibility of more this coming weekend. Can it happen again? Maybe. . . hope so! When I lived in southeastern Idaho, I would have said YES! I remember the blizzard we had on Valentine's Day in Pocatello the year I moved to Washington. I can only hope.
Tuesday, January 20, 2009
Snow Emotions. . .
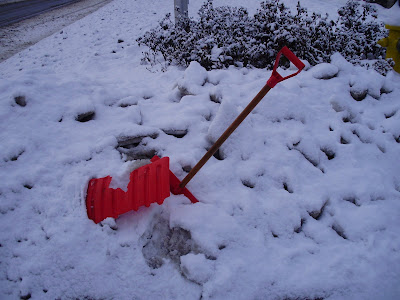
On Christmas day, as I walked to my elderly friend's home to spend some time with her, I came across this scene. It made me wonder how the person shoveling snow felt when their shovel broke with the load of snow they must have been trying to remove. I am sure the person shoveling had the opposite thoughts of me about snow. . .
Have I told you how much I love the snow? I love walking in it; taking photos; shoveling people's sidewalks and driveways; building snowmen and snow forts and just watching it come down, delicate flakes landing on my outstretched tongue.
I have lived where the snow is so deep that it was months before it all melted and I miss upstate New York for just that reason. If I could, I would move back there to enjoy my "senior" years. . . but instead, I live in WAshington where getting more than half an inch of snow is not pleasant for most people who aren't used to it and only complain. This winter was the most snow in over 20 years here. I would have gladly shoveled their drive/sidewalk IF they had a working shovel.
Monday, January 19, 2009
Trying a macro . . .
Sunday, January 18, 2009
Odd Shots MONDAY
If you want to join ODD SHOTS, see Katney
I don't know why I took this picture of part of the cement wall that holds the I-5 bridge up but after I did. It looks like "paintings" on the wall. Do you see them? Click to enlarge to see a better view of it. If not odd, definitely strange.
Saturday, January 17, 2009
Blog Your Blessings Sunday
If you care to join us acknowledging our blessings go here: Blue Panther
We have had so much fog and overcast skies that it has been quite awhile since we were able to view Mt. Hood in Oregon, across the Columbia River. This week, I have been able to get out and walk and for that I am very thankful as it is something I really enjoy -- especially with my camera along!This is just another view of Mt. Hood but one we haven't seen lately so it is definitely my blessing this week. CLICK to enlarge.
For other photos of Mt. Hood, see the posts just below as I have been featuring it for several days.
Subscribe to:
Posts (Atom)
About Me
- PERBS
- WELCOME to my blog. I hope you will return often.
I am on my third digital camera, all Olympus. I enjoy using it and sharing my photos. I also enjoy writing. I hope to share a little of each on this blog. My main blog is Postcards From the Northwest.
Kerri and I will continue to add benches to "For the Love of Benches Continued . . . " blog also. It is good to continue to share with her!
Continuation of the Kiggins House Re-model photos were lost when my computer crashed.
The latest city project, TURTLE PLACE, will unfold here as I have time to add photos. It is complete and maybe I can find enough photos someday to show you the final results. Next project after the two I am working on now. . .
Blogs I enjoy
-
-
13 years ago
-
12 years ago
-
-
-
15 years ago
-
-
-
-
-
-
-
-
10 years ago
-
-
13 years ago
-
-
-
-
-
-
9 years ago
-
-
15 years ago
-
9 years ago
-
-
-
15 years ago
-
-
-
-
12 years ago
-
12 years ago
-
-
10 years ago
-
-
Blog Your Blessings Sunday
Blog Archive
-
▼
2009
(304)
-
▼
January
(30)
- My view from/by the peninsula in the Columbia Rive...
- A sad note
- Odd Shots MONDAY
- Down by the river at sunset
- Blog your blessings Sunday: "Our" peninsula. . .
- Turtle Blur?
- Twinkle Plant
- Tutorial 2 for internet friend
- Snow Frosted Star
- memo to card friend
- Tutorial 1 for internet friend. . .
- Just a memory now. . .
- Snow Emotions. . .
- Trying a macro . . .
- Odd Shots MONDAY
- Blog Your Blessings Sunday
- Boats on the Columbia
- More Mount Hood
- Mt. Hood as seen from the Columbia River near Wint...
- Why I haven't been around to visit blogs yet today...
- Birthday blessings. . .
- Happy Birthday!
- Blog Your Blessings Sunday-- Memories
- Christmas Eve Icicles
- Paranoid squirrel . . .
- Flooding in WA state. . .
- Snow walk continued. . .
- Bridges Between - January 2009
- Blog Your Blessings Sunday
- The Columbia is rising!!!!
-
▼
January
(30)